PATIENT MANAGEMENT
INTRODUCTIONIn this section of the manual we will cover how to enter new patients into the practice and how to maintain their demographical information. This section is where you will tell the system what insurance company your patient has what patient classification they belong to, and other important information necessary to process the patients promptly and correctly. Most of the information that you enter here will be carried throughout the system when entering or requesting information about the patient. For example, when you are entering a transaction the system will pick up the necessary information that it needs to process this patients billing, based on your entry in this section. Lets begin by covering how to handle patients when they come into your practice. When a patient comes in to your practice you must first determine whether a record has been created in the computer for this patient, to avoid any duplication of records. If the patient is new to your practice you must take his demographical information and enter it into the system. Remember that if you have just begun using your computer system chances are that even if the patient has been to your practice before there will be no computer record of him/her. The important aspect is, that if the patient has no record in the computer a new patient record must be created. Hereafter we explain the steps to enter a new patients information record into the system.
PATIENT MANAGEMENT
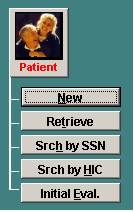
You will then have the following patient related functions:
Figure B.1
I. Enter a New Patient
To enter a new patient, using you mouse points the arrow to the first button, new, in the first column that consists of Patient related functions. Right click on this button in order to enter a new patient. The patient's record consists of three areas on this screen. Figure 5-2 will show you the first page of the patient’s demographical screen. Lets begin by entering the required information on the first screen.
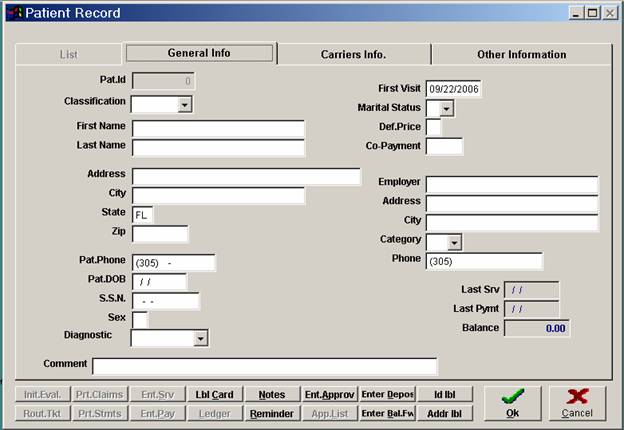
The system will now bring up the Patient's Demographical screen, in which you will answer various questions, pertaining to the patient, which you have now selected for entry. You will find on this screen different tabs. The patient screen is composed of three areas, General Info, Carriers Info, and Other Information. Lets go over what the fields of entry require:
A. General Information
Figure B.2 Pat. Id Enter the patients ID number. This is a numeric only field and can be up to 9 digits long. This field must never be left blank. We recommend that you utilize a unique numbering system. An easy way to accomplish this is to utilize the patient's social security #.
You may also elect to have the system assign automatic consecutive numbers to all of your patients as they are entered through the Patient Management section of the package. In any case, you must decide which numbering system your office will utilize prior to entering them into the system. If you choose that the system assigns automatic numbering to the patient's, the system will not prompt you to enter an ID#.
Classification Enter the patient's classification. This is an alpha‑numeric field, which can be up‑to 6 characters long. If you wish to see a list of classification codes, Right click on the arrow in this field. You will then see a list of classification to choose from. It is very important that you classify your patients properly, due to the fact that you will be using these classifications throughout the system, for better control and handling of the data entered. Whether it is doing your billing or printing reports to analyze the practice.
You may have as many patient classification's as you need. If you need to add any classifications you may do so through the "Edit system codes" section of the package. For reference on how to enter patient classifications refer to the "File maintenance" section of this manual.
First Name Enter the patient’s first name. This field is alpha only, (letters only) and can be up to 25 characters long. If the patient has a middle name you may enter it after the first name. Do not use any "." or "-" (Period's or hyphens). For example if the patient's name is John B. Smith your entry should be the following:
JOHN B
Last Name Enter the patient's last name. This is an alpha (letters only) field, and may be up to 28 characters long. If the patient has a compound last name you may enter them here. Do not use any "." or "-" (Period's or hyphens).
Address Enter the Patient's Street Address, i.e. 1234 S.W. 35 St. This field is alphanumeric and may be up to 28 characters long. Make sure that when entering the address, that you do not use any special characters, such as periods (.), hyphens (-) etc... City Self‑explanatory. Enter here the city, in which this patient resides. Make sure when entering the city, that you do not use any special characters, such as hyphens (-) or periods(.). For example if the city of residence is "St. John" your entry should be the following.
ST JOHN (NO PERIOD) State Enter here the state in which this patient resides. The entry for the state must be made in the standard postal abbreviation for mailing. For example if the state of residence of the patient is Florida, then your entry should be the following;
FL
Zip Enter here the Zip Code in which the patient resides. Your entry here may be up to nine standard five digit Zip Code or the nine digits Zip Code when required.
33100
Pat. Phone Enter the Patient's Telephone Number. This field is numeric, it is a self-formatting field; enter here the number here, the dashes and parenthesis are automatically placed by the system.
Pat. D.O.B. Enter the Patient’s Birth date. This is a six character self-formatted, numeric field. When entering you must enter all 6 digits, i.e. Patient’s birth date is January 20, 1980, you will enter 01201980. Immediately upon entering the system will include the appropriate separators and the date will display as follows: 01/20/1980
S.S.N. This is a self-formatted, numeric field. This field is for the patients Social Security Number. Enter the number here, when available, the dashes are automatically placed by the system.
Sex Enter the patient’s sex category. This is one character alpha (letters only) field. Therefore enter “M” for male and “F” for female.
First Visit This field is to record the date when this patient first visited your office. Your entry here will also allow you to request analytical reports, and graphs that will allow you to see at what time your practice has seen the most new patients.
Marital Status This field identifies the patient's marital status. Right click on the arrow and choose from the following:
“S” Single “M” Married “W” Widowed “D” Divorced “U” Unknown
Def. Price Enter here default price for which to bill this patient. You can enter here from 1- 6, this field works in conjunction with the fee 1- 6 on the procedure code file, refer to the file maintenance for procedure information This field will allow you to over-ride the procedure price setting determined by patient’s insurance company. Keep in mind however, that if the insurance company for this patient is changed, it will again reset this field.
Co-Payment Enter the co-payment amount per visit for this patient based on their insurance policy. By entering this amount the system will prompt after entering a service, that the patient will be responsible to pay this amount. This field if applicable should be used, due to the fact that by having the system automatically tell you that the patient is responsible for a portion of the service entered, at the time of the visit, will help you in better collecting funds due from your patients.
Employer Enter here the patient employer information. This is a free formatting field, and any entry will be accepted whether it is characters, or numbers. Enter the patient appropriate employer name in this field.
Address (of Employer) Enter the patient’s employer address for the patient in this field.
City (of Employer) Enter the patient's employer City, State, and Zip Code in this field.
Category Right click on the arrow to show list of categories. You can choose from the following options:
“FE” Full Time Employed “PE” Part Time Employed “NE” Not Employed “RT” Retired “FS” Full Time Student “PS” Part Time Student “NS” Not Student
Phone (of Employer) Enter here the patient's work phone number. This is a self‑formatting field. Enter the number here including the area code; the dashes and parenthesis are automatically placed by the system.
Comment This is an alphanumeric field and may be up to 27 characters long. This field is used to place a patient comment in their demographical record. This comment will come up anytime that the patient's record is retrieved, even when entering transactions, scheduling appointments to the particular patient. This field is an optional field of entry. I.e. BAD PAY, DON'T ACCEPT CKS, DIABETIC, ALLERGIC TO PENICILLIN etc.
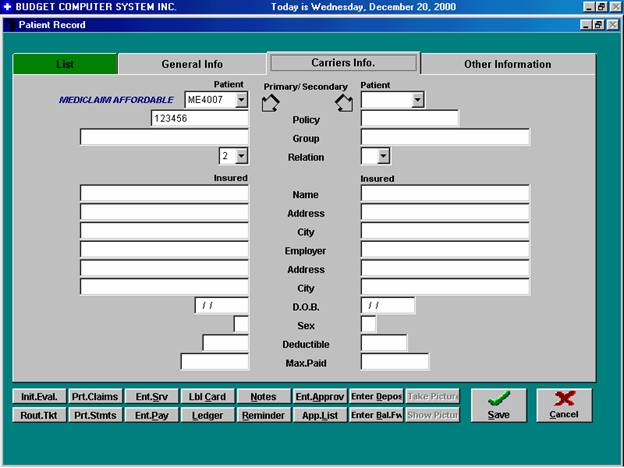
B. Carriers Info.
Figure B.3
Primary Carrier Enter the code corresponding to the Primary Insurance Carrier. For a list of Insurance Company Codes, click on the drop down arrow. Once you have entered the correct code, the system will display the meaning assigned to the code entered. This is an alphanumeric field and may be up to 6 characters long. It is important that this field be properly completed before processing insurance for the patient. Otherwise, you will be unable to obtain a complete insurance form with the complete information. However, you will have the ability to obtain an insurance form but you will have to manually complete the required information.
Policy Enter the Patient's Insurance policy Number here. This is not an automatically formatting field, so any formatting characters desired should be entered at this time. Such as: dashes, hyphens, parenthesis, etc.. This is an alphanumeric field and may be up to 15 characters long. Group Enter the patient's group identification number, when applicable. This is not a self‑formatting field, so any formatting characters desired must be entered at this time. Such as: dashes, hyphens, parenthesis, etc. This is an alphanumeric field and may be up to 15 characters long.
Relation Enter the patient's relation to the insured here. You can choose from the list given when you right click on drop down arrow. Your choices of entry are listed hereafter:
If your answer is "Self" then the system will skip all the questions that pertain to the insured person information on the lower portion of this screen, otherwise the system will prompt you to answer the following questions about the insured person.
Name (of Insured) Enter here the insured's full name as it appears on the insurance card, if other than the patient's. This is an alpha (letters only) field, and may be up to 29 characters long.
Address (of Insured) Enter here the address of the primary insured if different from the patient's. Otherwise, leave field blank, and the system will default to the Patient's address. This is an alphanumeric field, which may be up to 28 characters long.
City (of Insured) Enter the City, State, and Zip Code of the policyholder in this field (if other than the patient). Employer (of Insured) Enter the Employer Name of the policyholder, if different than the patients. Address Enter the Employer address of the policyholder, if different than the patients.
City In this field, enter the Employer City, State, and Zip Code for this policyholder, if different than the patients.
Birthday This is a self-formatting, date field; therefore, there is no need to enter dashes. Enter the date of birth of the policyholder (if other than the patient).
Sex (of Insured) This field is used to identify the sex category of the Primary insured. Reply by entering 'M' for Male, or 'F' for Female.
Deductible Enter here the yearly deductible amount for this patient’s insurance policy. The appropriate entry in this field is important, due to the fact that the system will assist you in calculating the amounts that the patient will need to pay and the amount that the insurance will pay at the time that any services are rendered, based on this entry
Max PaidEnter here the maximum amount of lifetime coverage that this insurance will pay on this patient’s policy, or 0.00 if there is no limit.
Secondary Carrier Enter the code corresponding to the Secondary Insurance Carrier. For a list of Insurance Company Codes, right click on the drop down arrow in this field. You will then see a list of codes that you have entered into your system. Once you have entered the correct code the system will display the meaning assigned to the code entered. This is an alphanumeric field and may be up to 6 characters long. It is important that this field be properly completed before processing insurance for the patient. Otherwise, you will be unable to obtain a complete insurance form. However, you will have the ability to obtain the insurance information from the patient's file, and address the insurance form manually.
Policy Enter the Patient’s Secondary Insurance policy Number here. This is not an automatically formatting field, so any formatting characters desired should be entered at this time. Such as: dashes, hyphens, parenthesis, etc.. This is an alphanumeric field and may be up to 15 characters long. Group Number Enter the Insured’s Group identification Number, if applicable. This is not a self-formatting field, so any formatting characters desired must be entered at this time. Such as: dashes, hyphens, and parenthesis, etc. This is an alphanumeric filed and may be up to 15 characters long. Relationship Enter the patient's relation to the secondary insured here. Right click on the drop down arrow for list of available choices, choices are as follows:
If your answer is "Self" then the system will skip all the questions that pertain to the insured person information on the lower portion of this screen, otherwise the system will prompt you to answer the following questions about the insured person.
Name (of Insured) Enter here the secondary insured's full name as it appears on the insurance card, if other than the patient's. Otherwise, leave this field blank, and the system will automatically default to the patient's name. This is an alpha (letters only) field, and may be up to 17 characters long. Address (of Insured) Enter here the address of the primary insured if different from the patient's. Otherwise, leave field blank, and the system will default to the Patient's address. This is an alphanumeric field, which may be up to 28 characters long.
City, State & Zip (of Insured) Enter the City, State, and Zip Code of the policyholder in this field (if other than the patient). Insured’s Employer Enter the Employer Name of the policyholder, if different than the patients. Address Enter the Employer address of the policyholder, if different than the patients.
City, State & Zip In this field, enter the Employer City, State, and Zip Code for this policyholder, if different than the patients.
Birthday This is a self- formatting, date field; therefore, there is no need to enter dashes. Enter the date of birth of the policyholder (if other than the patient).
Sex of Insured This field is used to identify the sex category of the Primary insured. Reply by entering 'M' for Male, or 'F' for Female.
Deductible Enter here the yearly deductible amount for this patient’s insurance policy. The appropriate entry in this field is important, due to the fact that the system will assist you in calculating the amounts that the patient will need to pay and the amount that the insurance will pay at the time that any services are rendered, based on this entry
Max PaidEnter here the maximum amount of lifetime coverage that this insurance will pay on this patient’s policy, or 0.00 if there is no limit.
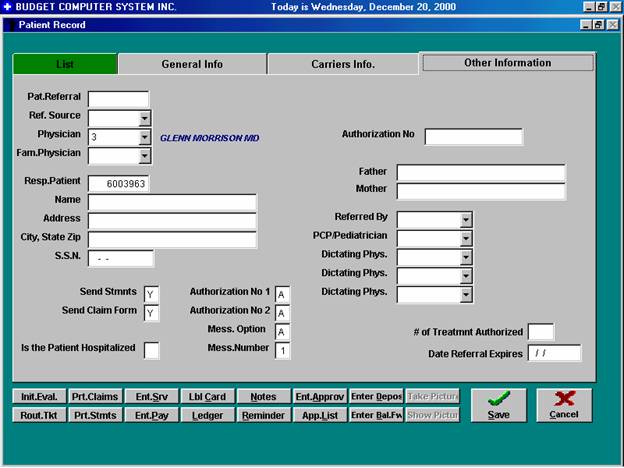
C. Other Information
Figure B.4
Patient ReferralIf this patient was referred to the practice by another patient, enter the ID number of the patient who referred this person to your practice. Otherwise skip over this field by pressing
Note: You can right click on this area, in order to search for referring patient’s ID.
Referral SourceThis field is for the referral source. This field works in conjunction with the referral codes in the System Codes section of the package. To see a list of the referral codes that you have entered in your system, click on the drop down arrow and choose the appropriate code. If a code is specified here it will automatically be entered in the referral field on the Service screen. This information can then be used by the Analysis Reports to measure income in comparison to other referral sources. Physician This field requires a code for the physician. Enter here the code for the physician that will be doing services for this patient. This code may be up to six alphanumeric characters in length. To see a list of Physicians, click on the drop down arrow to choose from available choices.
Family PhysicianEnter in this field the name of the patient's family physician, when known. The input herein is for reference purposes only. This is used by those offices that like to know the name of the family practitioner in cases where said is not necessarily the referring physician.
Resp. Patient (Responsibility regarding statement)The system will default to the patient’s number automatically. If the Responsible party for this patient is different from him/herself then this information can be entered after saving your new patient and being given a patient id. Once this is done, in order to enter Responsible patient information, you must go to the button “Retrieve” (beneath “New”) and enter this patient id, click on the Other Information tab and go to the appropriate field. If the responsible party for this patient is also a patient, enter that patient's ID number in this field. If the responsible party is not a patient, then leave the same patient ID# and enter the responsible party demographics in the following fields. In the event that the patient is responsible for their own charges, leave the patient's ID# here In addition, when sending family statements, all patients with the same responsible party ID will be linked by the system as a family unit and printed on the same statement. This statement will be addressed to the patient specified as the responsible party, and will detail the balance due per each patient on the family group.
Name Enter here the complete name of the Responsible Party if other than the patient. This is an alpha (letters only) field, which may be up to 28 characters long. If no information is entered here the system will default or pick up the Patient's First and Last name.
AddressEnter the responsible party address, if different from the patients'. If no information is entered here the system will default or pick up the address entered for the patient. This is an alphanumeric field and may be up to 28 characters long.
City, State &, ZipEnter the City, State, and Zip Code of the Responsible Party Address in this field, if different from the patients'. If no information is entered here the system will default or pick up the address entered for the patient.
S.S.N. Enter the Social Security Number of the responsible party in this field for your reference. If no information is entered here the system will default or pick up the address entered for the patient.
Authorization No This information is pending…ask Mandy when done
Note: The following 7 fields are intended for use by Pediatric practices.
FatherIf applicable, enter here the patient’s Fathers name. This is an alphanumeric field that may be up to 30 characters long.
MotherIf applicable enter here the patient’s Mothers name. This is an alphanumeric field that may be up to 30 characters long.
Referred ByThis field is used as a secondary referral source. This is also used in conjunction with the referral codes section of the system. To see a list of Referral Codes that you have entered in your system, click on the drop down arrow and choose from the options available.
PCP/Pediatrician This field is used to enter either the Primary Care Physician or the Pediatrician for this patient. This filed is used in conjunction with the referral codes section of the system. To see a list of Referral Codes that you have entered in your system, click on the drop down arrow and choose from the options available.
Dictating Phys. There are three fields available for this information. This field is used primarily to enter, if applicable, any other physicians in connection with this patient. It is also used to list physicians that this patient has requested that they’re Office Notes to be sent to.
Note: This section is predominantly for billing information. It will allow you to tell the system special ways of handling certain patients. For example, if you do not want the system to send statements to this patient, you can define that here. Maybe you do not want the system to print insurance forms for a specific patient. Lets go over the different defaults that you can specify for each patient.
Send Stmnts Enter "Y" if you want the system to generate statements for this patient; Otherwise, enter "N" and no statement will ever be generated for this patient. Regardless, if he meets the criteria selected for generation of patient statements.
EX. Dr. friend. You want to bill insurance, but never bill him. Enter "N"
Send Claim Form Enter "Y" if you will like to bill the patient's insurance company for services render. Otherwise, enter "N" and the system will never generate an insurance form or claim for this patient; regardless, if the service entered was marked "I" for insurance. EX. Dr. Relative, has insurance but Dr. never wants to bill the insurance company, enter "N".
Authorization No 1This field is used in conjunction with position 12 of the standard AMA form. Your entry here will identify the text, which will print on the insurance form. Your entry options are as follows:
A. Signature on File B. Patient Deceased
The information to be printed, depending on your reply here, A or B, may be updated through the system management section of the package, specifically tailor system to user. For more information on how to change the meaning to these variables refer to the section of this manual labeled System Management. Otherwise, leave field blank, and no information will be printed in this position of the standard AMA form.
Authorization No 2 This field is used in conjunction with position 13 of the standard AMA form. Your entry here will identify the text, which will print on the insurance form. Your entry options are as follows:
A. Signature on File B. Patient Deceased N. None
Otherwise, leave field blank, and no information will be printed in this position of the standard AMA form. As with Authorization 1, the meaning to variables hereby, A or B, may be altered through System Management, specifically Tailor System to User.
Mess. OptionThis is a one character alpha (letters only) field. Enter here the letter from A to I, which corresponds to the type of messages you would like to show on the individual patient statements. The value of the letters is indicated on the following list:
A ‑ Send regular and overdue messages. B ‑ Send regular but not overdue messages. C ‑ Send overdue but not regular messages. D ‑ Don't send any messages. E ‑ Send regular and over 60 days. F ‑ Send regular and over 90 days. G ‑ Send regular and over 120 days. H ‑ Send regular and over 150 days. I ‑ Send regular and over 180 days.
Mess. Number This is used in conjunction with the Regular Message file, which allows you to enter up to a maximum of seven regular messages. EX. Of a regular message: HAPPY HOLIDAYS. In this field enter any number from one to seven depending on which of your seven messages you would like to show on the individual patient statement. EX. "1" ‑ Enter the 1st regular message of the file.
HospitalizedThis field is self-explanatory. If the person if hospitalized enter “Y” here. If not leave blank or enter “N”.
Once you have entered all the patient’s demographical information, using your mouse click on the button “Save” that is located on the lower right hand side of your screen. The system will then prompt you with a message containing your new patient’s Id#. If you do not want to keep the information you have entered, using your mouse, click on the “Cancel” button located on the lower right hand section of your screen. The system will prompt you with a question saying “are you sure you want to cancel?” Click on yes if you do not want to enter this information in your system.
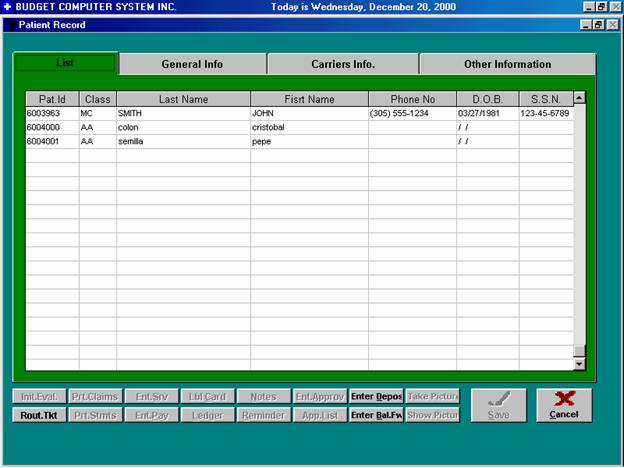
II. Retrieve An Existing Patient’s Record
To retrieve an existing patient record using your mouse Click on the Second Button, Retrieve, in the patient related functions column. The system will then ask you to “Enter Patient Id Number”, if you do not know the Id# Right click in the field provided. This will bring up a screen where you can search for patient by First or Last name, or leave this area blank and click on “find” to search through the whole Patient List. Whether you entered the Name or are searching the list, once you have found the patient you need, mark it by clicking somewhere on that row and either press ESC. Or close the window, the system will then place the patient id you choose in the box asking for patient id then press enter or click on okay. The system will bring up the patients' demographical screen. From here you may go to the second and third tab of the patients' demographical information, if you wish, to edit any of the information. Remember, if you do not want to change any of the information that has already been entered just click on the cancel button located on the lower right hand section of your screen. The system will prompt you with a question “Are you sure you want to cancel” Click on yes and the system will take you to the main screen of the program. Otherwise, click on the save button to keep any information you have changed.
Note: There are multiple transactions that can be performed when retrieving a patient. When you retrieve a patient, at the bottom of the screen there are 16 buttons available to choose from. These buttons allow you to move to other sections of the package from the patient information screen, without having to leave it. You will have the following options to choose from: Initial Evaluation, Routing Ticket, Print claims, Print Statements, Enter a Service, Enter a Payment, Label Card, Patient Ledger, Notes, Reminder, Enter Approval Information, Appointment List, Enter Deposit, Enter Balance Forward, take Picture and Show Picture. All these options are later explained in this manual refer to the appropriate sections to retrieve information on these buttons available to you.
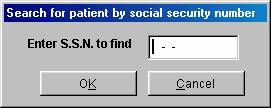
III. Search By Social Security #
Figure B.5
This function will allow you to search for a patient number based on the patients social security number. This function will be very handy in the case that you need to retrieve a patient’s file, and all the information that you have in reference to the patient is his Social Security number.
To access this function, simply click on the button “Srch SSN”. The system will then bring up a box that will prompt you with the question ”Enter S.S.N. to find”. Enter the social security number here; the dashes are automatically placed by the system. Once you have entered the number the system will search for the number you have requested. It will then bring up a screen that consists of all the patient details. If it does not find a matching S.S.N# it will prompt you telling you so.
Figure B.6
IV. Print Initial Evaluation Form
If you would like the system to print an initial evaluation form click on the button that reads “Initial Eval.” The system will bring up a box prompting you to enter the patient Id and the form name to use. Enter the patient Id, if you do not know the Id# Right click in the field provided. This will bring up a screen where you can search for patient by First or Last name, or leave this area blank and click on “find” to search through the whole Patient List. Whether you entered the Name or are searching the list, once you have found the patient you need, mark it by clicking somewhere on that row and either press ESC. Or close the window, the system will then place the patient id you choose in the box asking for patient id. If you do not wish to have to enter the initial evaluation form name each time you are going to print, then you can enter the default form name in the "Tailor System to User" section of the program. Refer to the section entitled "System Management" of this manual for more information on how to enter into this section. This will print a form for the doctor to record his initial patient evaluation. To print an initial evaluation form you must first enter the patient's demographical information into the system. For information on how to enter a new patient record you can refer to the beginning of this section, which covers entering a new patient's demographical information. Before printing, make sure that your paper has already been loaded into the printer and that the printer is set to "On-Line" mode.
SUMMARY
We have now completed covering the Patient Management section of the Doctor's Management System. The primary function of this section is to maintain the patient's demographical information correct and up to date. This is essential to your billing and collection department, and most important to maintaining excellent patient relations. Remember that all information that is entered in this section will be used throughout the system. For insurance claims processing, for processing patient statements, for generating analytical and demographical reports, and many other functions. Due to the fact that the above referenced is such an important aspect of the system as far as the accuracy of the data, it is very important that the information entered here is up-to-date and correct in all aspects as the data entered here could affect your billing to insurance companies and to patients directly. |