|
The Transaction Management section of the package is where we will be maintaining the daily posting of transactions to the patient's accounts. There are three things that the system considers transactions; they are, the following: Services rendered, payments received from patients or insurance companies, and adjustment made to patient’s accounts to alter the balance in any form other than by a Service or Payment. After you have entered your patients demographical information into the system the next step is to tell the system what are the transactions that occurred to this patient's account. Therefore, the transaction management section of the system can be considered the checkout section of the package. As patients come in to your practice and are checked-out through the computer you will also have the ability to give print Walk-out Statements (Receipts). As you can see, the primary functions of your practice daily routines will be conducted in the Transaction Management section of the package. There are other functions in this section as well. For example, we have the ability to print Routing Tickets (Sometimes known as super-bills, or encounter tickets). Here you will also be able to retrieve a previously entered service for the purpose of editing. Although, at no time you will be allowed to edit the fees or the procedure codes for security and accounting balancing purposes. You will also have the capacity to enter the patients' balances prior to the implementation of this solution; otherwise known as balance forward amounts. You will also have the ability to enter deposits, payments in advance of services rendered, into patient accounts to be later applied when the service is rendered. Lets go over this section of the package in detail.
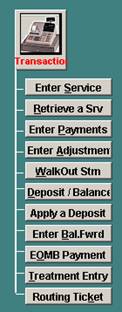
The Transaction Related Functions column is the second column on your screen.
In this column you will have the following buttons to choose from:
Figure C.1
I. Enter A Service
This function will be used to enter any services that are rendered to a patient. To implement this function click on the button that reads “Enter Service”. The system will now bring up the service entry screen. Lets go over how to implement this function, to your daily work at your office.
When you first go into the service screen the CURSOR will appear at a designated field as specified in the "System Management" section of the program. You will notice that there are other fields at the top of the screen, or perhaps at the bottom. In most cases some of the information such as the assignment information, and referral may be already defaulted, based on your entry in the patients file. If this case is not true, then you will need to update the proper fields with the correct information in order to properly generate the billing for the patient. The fields of entry are hereby explained:
A. Service Information
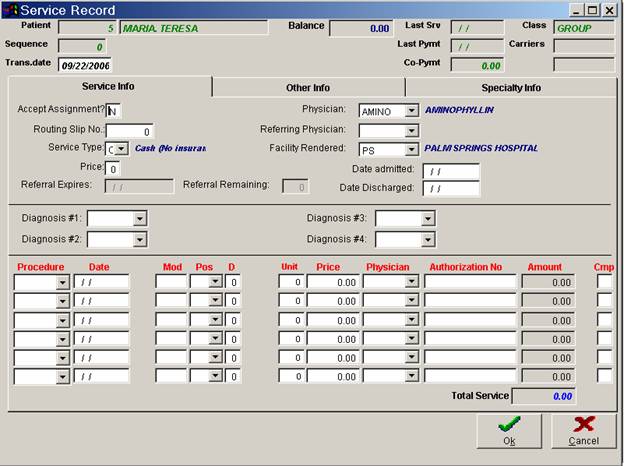
Figure C.2
Accept Assignment
This is a one character alpha (letters only) field. Enter either "Y" (Yes) or "N" (No). The answer depends whether or not your office will accept assignment of payment for the charges hereby being posted. Your answer to this reply will let the insurance company know the terms in which your office will accept payment for the services rendered.
Physician
This field will automatically display the internal physician code entered for this patient in the patient management section of the package. However, if a different physician rendered the services being billed, simply enter here the appropriate system code for the service- performing physician. For a list of Physician Codes that you have entered in your system click on the drop down arrow and choose from the options available to you.
The entry here will indicate the performing physician information on both the insurance form and all applicable reports.
Routing Slip No
In this field you must enter the routing slip number that was used for the patients services being posted.
This field works in conjunction with the systems Missing Routing Slip Report. It is very important that you enter the correct routing number so that the system can generate an accurate report. This is a numeric field. Enter here the number, which corresponds to the routing slip for the services being hereby entered.
Ex: Services correspond to routing slip # 78
Entry: 78
By properly entering the routing slip number here at the end of the day your office will be able to request a missing routing slip report, to verify that all entries for services rendered were posted.
Referring Physician
Enter the code for the patient's referring physician in this field, when applicable. For a list of Physician codes that you have entered in your system, click on the drop down arrow and choose from the options you have available to you. When a service is entered for the patient, the referring physician from the patient's record will be automatically entered here. You may manually override this entry by entering another physician's code.
Service Type
This is a one alpha (letters only) character field. Either you reply "I" for Insurance or "C" for Cash or Non‑Insurance. You may also enter in this position any of the internal service type codes established by you in the Edit System Codes section of the package, to further distinguish your claims. To see a list of codes available click on the drop down arrow and choose from the options available. Proper service categorizing or type is important to manipulate your data, as required by your office, during insurance billing, or review of insurance reports.
It is essential that you label the service transactions properly. For if you want to generate an insurance form for the services entered you must have entered a type "I" or any of your other codes set up by your office in this field. Otherwise, no insurance form will ever be generated for those services.
Price
Enter here the default price that you would like to charge this patient for the services you are entering. The system automatically defaults the default price field set both in the patient record and the patient classification. You may over ride that selection here.
Referral Expires
Enter here the date the referral expires for services to be performed to this patient, as stated by the applicable insurance company. This field will be displayed when you are entering services to this patients account. It is important that this field be maintained up to date, as if services rendered after the referral expires the insurance company may deny your claims.
Referrals Remain
If you are using the option of the system, to maintain a count of the number of referrals from your insurance companies that the patient has for treatments to be performed, then properly update this field with the right number of referrals. The number of referrals can be entered in the patient record. The system every time that a service is entered to the patients account, the system will automatically deduct one referral. Also note that the referral has an expiration date, this date is maintained in the patient record.
Facility Rendered
Enter here the code corresponding to the facility where the services were rendered, if other than your office. For a list of facility render codes you have entered in your system, click on the drop down arrow and choose from choices available. The codes for this field correspond to the codes that you entered in the Edit System Codes section of the package under Hospitals.
Diagnosis #1 -#4
Enter here the appropriate diagnosis code for which services were rendered. Each service screen allows for up to 4 different diagnosis codes to be entered. If you do not know the appropriate diagnosis code that you require for entry, at this time click on the drop down arrow and choose the appropriate code for your entry. The codes for this field correspond to the codes that you entered in the Edit System Codes section of the package under Hospitals.
Procedure
Enter here the internal system code, which corresponds to the procedure being entered. For a list of the available procedure codes you have entered in your system, click on the drop down arrow and the system will give you a listing of the available internal procedure codes.
If the procedure code that you are entering has a default modifier then the system will automatically pick up the modifier after you hit ENTER. If you wish, you can manually override it.
Remember that all information entered here is what will appear on the procedure line of the AMA or insurance claim form; therefore, your entries must be accurate.
Date
If you are using the option of the system to enter a range of dates, then the system will give you the ability to enter, a from and to date for the services being billed. Otherwise you will only be able to enter a single date of service.
Mod
Enter here the modifier code that applies to this service that you are billing. If you do not know the code of the modifier that you wish to enter, you may click on the drop down and the system will display a list of the available system modifier codes that you have entered in your system.
Pos
Enter here the place of service relative to the procedure that you are billing on this entry line. For a list of the applicable place of service numbers click on the drop down arrow and the system will give you a listing of the appropriate place of service codes.
D
Enter here the number, which corresponds to the diagnosis entered above, for which this service was performed. If more than one diagnosis applies, enter only one here. That is, enter the number associated to the diagnosis, which applies the most for the procedure. Your reply here may be any number from 1 to 4, following the order by which the diagnosis codes were posted.
Unit
Enter here the number of units being billed for the procedure hereby being entered. The number that you enter here will appear as the number of units on your insurance claim forms, or the electronic transmission. Also the number of units hereby entered will be used to multiply by the standard price in the procedure file. Additionally, if you are billing for a range of dates, for example from the first of the month to the fifteenth of the month, the system will automatically default to the number of units based on the number of days that you are billing for. You will still have the ability to edit this information.
Note: See also effective date.
Amount
Enter here the amount of procedure that you want to bill the patient for the service rendered. If no amount is entered the system will bill the fee assigned to the procedure rendered on the System Code section of the package, in accordance to the fee schedule assigned to the patient.
Physician
Enter here the code of the physician who is performing the procedure herein being billed. If you do not know the code of the physician that you wish to enter, you can click on the drop down arrow and the system will display a list of the available system physician codes.
Authorization No
Enter here when applicable, the authorization number from the insurance company, to perform this procedure. This number may be required to appear on the insurance form. Please refer to the patient’s insurance policy for more details on which procedures require authorization prior to performing. The system will only ask you for this information in the case that the procedure in the procedure codes file, or in the Blue Book specifies that this procedure require authorization.
Once you complete your entries, click on the okay button to save your entry. If you wish to exit without saving any of this information click on the cancel button and the system will prompt you “Are you sure you want to cancel?” Click on yes to exit without saving the information entered. Now you may pull up an on-screen patient ledger and the service will appear.
You may enter up to six procedures for each service screen. Also please note that their are other fields of entry on the second and third tab of this service screen. To get to the second or third page at any time you can click on the tab desired and you will have the desired screen in front of you Most of the information on the second page is often times not used, but in the case that you may need to specify a special circumstance, then you will need to do so on this page. For an example of the second page of the service entry screen please refer to figure 6-3.
B. Other Information
 0
0
Figure C.3
Accident Related
If these services are accident related then enter "Y", otherwise enter "N". This will mark an "X" on the appropriate box in the insurance claim form. This field may be used for insurance purposes when treating patients who are injured due to an accident.
Work Related
Enter a "Y" if the reason for this service is work related (i.e. an accident on the job, etc...). Otherwise, leave as "N".
Date Able to return to work
This is a self‑formatting, date field. It allows for the entry of the date in which the patient may return to work, if it applies. This entry is used mainly for patients seen under Workman's Compensation.
Entry Example: DRTW ‑ May 5, 1988
Enter as: 05051988, Upon Return the System will display 05/05/1988.
Functional Status Code
Enter here the appropriate internal system status code, as entered in the functional status code section file maintenance.
Pat Resident
Enter here “y” if the patient is in a nursing home. If not applicable leave this field blank.
Date first consulted fro condition?
This field is for you to enter the date on which the patient first consulted the provider for the condition for which services are being entered on this service screen. This is a date, self‑formatting field.
Ex. Date of January 1, 1990 simply enter, 01011990, after ENTER the system will display 01/01/1990.
Date of First Symptom
Enter here the date the patient claims symptoms, or complaints began for the above mentioned diagnosis codes. This field may be required by insurance companies for determining eligibility of services billed, due to pre-existing conditions.
Comments
The comments that appear here are the same as entered in the patient’s demographical record. You may edit the comment in the patient file at this time. This is a free editing field; you may enter any reference that may assist you in processing this patient’s information.
Other Procedure Information
ID#
If the service in question was purchased from another provider, enter that provider’s ID number here. Otherwise you may leave this field blank.
Name
If the service in question was purchased from another provider, enter the provider’s name here; otherwise you may leave this field blank.
State
In this field enter the state for the provider that purchased the service. Ex: Fl
CLIA Number
The CLIA # is a number assigned to laboratories who render services such as lab test not performed in the doctors office. This number should be that one which is assigned to the lab by Medicare. Please refer to your Medicare updates for information on the use of CLIA Numbers. Enter here the Clia number of the provider. If there is no CLIA number then you may leave this field blank.
Class Finding
This should be used for when routine foot care utilization has been exceeded. You must use a combination of the following options in this manner.
One CLASS A; or 2 CLASS B; or 1 CLASS B and 2 CLASS C findings. Here are the findings;
CLASS "A" findings:
A10: Non-traumatic amputation of the foot or integral skeleton portion thereof.
CLASS "B" findings:
B31: Hair growth (decrease or absence)
B32: Hair changes (Thickening)
B33: Pigmentary Changes (Discoloration)
B34: Skin texture (This Shiny)
B35: Skin Color (Rubor or Redness)
CLASS "C" findings:
C10: Claudication
C20: Temperature changes (e.g. Cold Feet)
C30: Paresthisias (abnormal spontaneous sensations in the feet)
C40: Burning
C50: Edema
This field is self-explanatory. Enter here any class finding for the procedure being entered.
Sys. Cnd
This field is self-explanatory. In this field enter the systematic condition for the procedure being entered.
T
This field is used to indicate to you if the procedure being entered is therapy. Enter “Y” if the procedure is therapy, otherwise Enter “N” or leave this field blank.
Ag. Code
Self-Explanatory, Enter here the appropriate agency code.
N
Enter here “Y” if there is a narrative for the procedure being entered; otherwise enter “N” or leave this field blank.
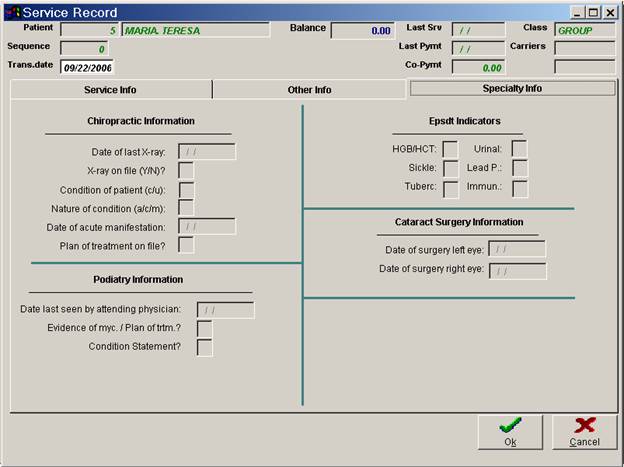
C. Specialty Information
 0
0
Figure C.4
Note: This Specialty Information Tab has areas reserved fro Chiropractic Information, Podiatry Information, Edsdt Indicators, Cataract Surgery Information and Hospital Information. These areas are of us to you depending on the type of practice that you operate.
Chiropractic Information
Date of Last X-ray:
Enter here the date of the last X-ray done to the patient. This is a self-formatting field. Ex: If the date is July 08, 1999, enter 07081999, the system will the display 07/08/1999.
X-ray on file (Y/N)?
This is self-explanatory. If the patient X-ray is on file, enter “Y” here otherwise enter “N” or leave this field blank.
Condition of Patient(c/u):
Enter here the Patient’s condition. Enter “C” if the patient condition is complicated, otherwise enter “U”.
Nature of Condition (a/c/m):
In this field enter the Nature of the condition of the patient. Enter A- Acute, C-Chronic, M-Acute Manifestation of a Chronic condition.
Date of Acute manifestation:
If in the previous field you entered M – for Acute Manifestation of a chronic condition, the system will take you to the next field. This field asks for the date of Acute Manifestation. Enter here the date. This is a self-formatting field; the system will place the necessary dashes. Ex: If the date is December 06, 1942, enter 12061942 and it will show 12/06/1942. If this field is not applicable to you the system will automatically skip over this field of entry.
Plan of treatment on file?
This field is self-explanatory. Enter here “Y” if the plan of treatment is on file; otherwise enter “N” or leave this field blank.
Podiatry Information
Date last seen by attending physician.
This field is used to specify the last date the patient was seen by the physician. There are certain insurance regulations in reference to this field, you should verify with the insurance company who may require this entry.
Evidence of Myc./Plan of trtm.?
Answer "Y" if this patient has evidence of mycosis and has a plan of treatment, otherwise answer "N".
Condition Statement
Your options are to answer "A" or "B". "A" signifies that the patient’s condition is severe and limits the patients condition to ambulate. "B" signifies that the patient is non-ambulatory but if condition is not treated it is likely to result in a serious medical condition.
Epsdt Indicators (used primarily by Pediatric Practices)
Enter “Y” or “N” in the following six fields provided: HGB/HCT, Urinal, Sickle, Lead P, Tuberc, and Immun.
Cataract Surgery Information
Enter here in the two fields provided, the date of surgery for the left eye and the date of surgery for the right eye. This is a self-formatting field; the system will place the necessary dashes. Ex: If the date is, March 27, 1999 enters 03271999 and it will show 03/27/1999.
Hospital Information
Date Admitted
This is a self‑formatting date field. Enter here the date on which the patient was admitted to hospital, if applicable. Otherwise, leave empty. To enter any date you must always enter six digits meaning MM/DD/YY. The following is an entry example of a patient admitted June 5, 1987.
ENTRY: 060587. Upon return the system will display 06/05/87
Date Discharged
This field is for you to enter the date when the patient was discharged from the hospital, if applicable. This field is used in conjunction with services being submitted which were performed in a hospital. This is a date self‑formatting field. i.e. to enter a May 10, 1987 discharge date, simply enter 051087; upon return the system will display 05/10/87.
You may return to the first or second page by clicking on the tab you want to return to. Once you have finished entering all of the information needed, your options as in all the sections of the system are as follows: Click on OK to save the information that you have entered for this patient, or click on cancel and you will loose all the information you have entered. Like in all other areas of the system if you press the ESC key the system will prompt you with the "Are you sure you want to cancel your changes" question. Answer yes or No accordingly.
If you are using the two balance option of the system, after you have clicked on OK, the system will then prompt you with a window requesting information for the amount of the service that the insurance is responsible to pay and the amount that the patient will be responsible to pay. If the system detects that the service is type "I" meaning to be billed to insurance, it will automatically default 100% of the service as insurance responsibility, unless you have specified in the patient’s demographic file that the patient have a co-payment amount. In that case the system will display the co-payment amount as the patients responsibility, and the remaining amount as the insurance responsibility. If there is no co-payment amount in the patients account then the system will base the balance split on the amount listed as insurance will pay for the services entered in the Blue Book that is considering that you are using this option of the system. For instructions on how to enter information to the Blue Book Codes file refer to the section of the manual entitled "File Maintenance". Although the system may default different amounts on this window you will still have the ability to edit the amount prior to saving the entry.
Once you have reviewed or entered this information click on the OK button. The system will then prompt you with a message giving you the sequence number for this service entry. After clicking on Ok you will be prompted with the following options by the system: Enter A Payment to this service, Print A Claim form for this service, and Print A Walkout Statement for this service. If you would like to perform any of these transactions you can choose yes to these prompts and the system will take you to the appropriate section of the package, otherwise enter No. If your answers were No to these options the system will return to the main screen of the program.
Figure C.4.1
II. Retrieve a Service Record
Once you have entered a service to a patient's account, if you wish to retrieve the service for the purpose of editing or just to look at it, you may retrieve it by clicking on “Retrieve a Srv” button from the Transaction Related functions column. Before I go on, it is important that you know that you will not have the ability to change neither the fees nor the procedure codes already entered: This is for security and accounting control purposes. If you need to change anything on this service screen, as far as prices or procedure codes, then you will have to delete the service and then re-enter it correctly. You can refer to the section that covers how to delete records in the System Management Section of this manual.
Once you have clicked on the “Retrieve a Srv” button the system will prompt you with two questions. It will now ask you the Patient ID# and the Service sequence number of the transaction that you wish to retrieve.
Enter the patients ID #:______
Enter here the ID# of the patient for which you would like to retrieve a patient service record. If at this time you do not know the patients ID# you, Right click in the field provided. This will bring up a screen where you can search for patient by First or Last name, or leave this area blank and click on “find” to search through the whole Patient List. Whether you entered the Name or are searching the list, once you have found the patient you need, mark it by clicking somewhere on that row and either press ESC. Or close the window, the system will then place the patient id you choose in the box asking for patient id then press enter or click on okay. Once you have selected the patient the system will then allow you to enter the sequence number. If you do not know the sequence number right click on that field, If this patient has a service entered, the system will prompt you with “Do you want to see only Services with Balance?” Click on yes or No accordingly. To choose the sequence number using either your mouse to highlight it or using the arrow keys on your keyboard, move up or down through this list. Once you have found the sequence number you need keep it marked and close this window.
At this time you will click on OK and the system will bring up the screen of entry. At this time you can edit any of the information that you need to edit. Remember that you will not be able to change the amounts or any information in relation to the procedure that was done. Once you have changed the information wanted you could save this information by clicking on OK at the right hand side of your screen. After clicking on Ok you will again be prompted with the following options by the system: Enter A Payment to this service, Print A Claim form for this service, and Print A Walkout Statement for this service. If you would like to perform any of these transactions you can choose yes to these prompts and the system will take you to the appropriate section of the package, otherwise enter No. If your answers were No to these options the system will return to the main screen of the program.
III. Enter A Payment
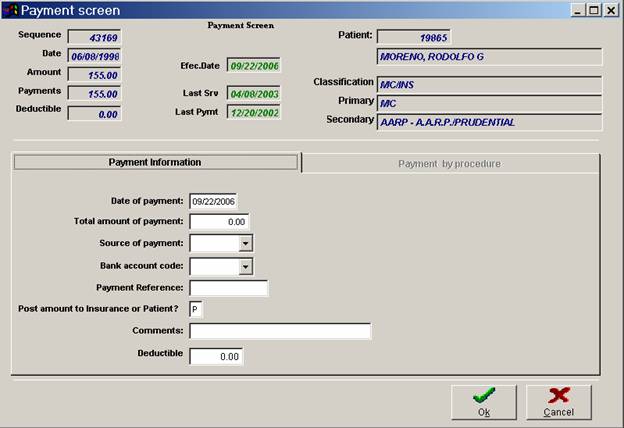
Figure C.5
To enter a payment to a patient's account click on the “Enter Payments” button located in the Transaction Related Column in the main screen of the program. The system will now bring up the prompt that ask you for the Patient Id # and/or Sequence #. If you do not know these numbers follow the procedure to search for Patient Id # and Sequence # previously explained in this manual. For an example of the payment entry screen refer to figure 6-7. Lets go over the fields of entry in the “Enter Payment” function. There are two tabs on this screen. Payment Information screen and Payment by procedure screen.
A. Payment Information
 0
0
Figure C.6
Date of Payment
Enter here the posting date for the payment hereby being entered. You can accept the date that is already put on the screen by just hitting ENTER, or change it as you deem necessary. Remember that this is a self-formatting field meaning that you do not need to enter the slashes(/) to separate the month, day and year.
Total amount of Payment
Enter here the amount of the payment that you are posting at this time. If your
Amount does not contain any amounts to the right of the decimal point then you can just write the numbers to the left of the decimal place and hit ENTER. For example, if the amount were $55.00 then your entry would be; ENTRY: 55. If the amount is $55.25 then your entry would be; ENTRY: 55.25
Source of Payment
Enter here the source of payment code for the payment being posted. This field should contain the internal system code for the patient’s insurance company, if applicable. The code for the patient’s insurance company is listed at the top right portion of the screen. If at this time it does not appear you can click on the drop down arrow in this field and choose the appropriate code from the listing of codes in your system. It is very important that you use the proper source of payment because the system will base all income production reports on these entries. For example, if the payment came in from Medicare and the code for Medicare in your system is "MD" then your entry here should be: ENTRY: MD
Bank Account Code
If you are using Bank Codes in your system then enter here the appropriate bank code for the payment that you are entering at this time. The system is prompting you for the internal system code that corresponds to the bank where the monies of the payment being entered will be deposited. For a list of all your internal system bank codes click on the drop down arrow in this field and choose the bank code needed for this payment.
Payment Reference
This is an open, free editing field, which is used to store any information you might want to store relative to the payment. However, it is recommended that you use this field to maintain the check number for the payment received, due to the fact that the system will give you a report by reference number at the end of your daily transaction report. This feature can be helpful in the case that an insurance company sends you a check paying on multiple patients. If you enter the check number at the "Reference" field every time you enter a payment, then the system can give you a report of reference numbers showing you the total amount of payments posted for every specific check number. This amount should balance with the amount of the check received. If it does, it means that you entered the payment distribution per check, correctly. Otherwise, this report will assist you in identifying which check was distributed incorrectly, consequently resulting in an erroneous entry made.
Post amount to insurance or Patient
If you are using a two-balance system, then you must enter whether this payment is going to be applied to the patients balance "P", or the payment will be applied to the insurance "I". It is imperative that the proper entry be made in this field, due to the fact that the system will update the patient’s balance according to this entry.
Note: The following information is only for those practices that are using the line item posting function of the system.
Comments
This is an alphanumeric field and may be up to 27 characters long. This field is used to place a comment about the patient in its demographical record. This comment will come up anytime the patient’s record is retrieved, even when entering transactions to the particular patient. E.I. Bad Pay, Don’t accept checks.
Deductible
This field will automatically default to the deductible you entered in the patient’s demographical screen. In that area you entered a deductible for Primary and Secondary Insurance companies. Depending on what payments have been entered for this patient, subsequently the system will retrieve the Primary Or Secondary Insurance deductible amount, if any. In other words if you have entered a payment for the Primary Insurance company, when entering another payment for this service the system will display the Secondary Insurance company deductible automatically. If you need to edit this field you can do so, otherwise just press enter to move on to the next step.
Once you have entered the above information necessary for you, click on OK at the lower right hand portion of the screen. The system will prompt you to “Enter the amount to transfer to the patient”. If applicable enter the amount you wish to transfer to the patient here. Once you have entered the amount or left it at zero (whichever applies to you) click on the OK button in this window. From this point the system gives you the option to transfer to other transactions related parts of the program. You will be prompted with the following questions: Do you wish to Print a Claim Form for this service? Is there any adjustment for this service?, Do you want to print a Walk Out statement for this service? . If you would like to perform any of these transactions you can choose yes to these prompts and the system will take you to the appropriate section of the package, otherwise enter No. If your answers were No to these options the system will return to the main screen of the program.
Payment By Procedure
On the “Enter A Payment Screen” there is another tab that is available to you. This area is “Payment by Procedure”. If you are using the line-posting option of the package in your practice, here you can split payments and change the completion flags. When you bring up this area of the package the screen will display the procedures that have been entered for this service, the CPT number and the balance. You then have two fields that you enter the amount paid and the completion flag for each procedure. This is further explained below.
Amount
On this screen you have a field to enter the amount being paid for each procedure. There are two options that you have when entering the line item amounts. For one you can leave all the items at 0.00, then the system will post the entire amount to the service. The second option being, entering the correct detail amounts to each service. Enter your choice here. If your amount does not contain any amounts to the right of the decimal point then you can just write the numbers to the left of the decimal place and hit ENTER. For example, if the amount is $85.00 then your entry would be; 85. If the amount is $55.25 then your entry would be; 55.25.
Completion Flag
This flag is used to tell the system if there are some services within a claim that have not yet been paid or they need to be re-billed. If the answer is "Y" the system will assume that no other payment or response for that service is necessary from primary. If the answer is "N" then the system will maintain the service on open status and you will have the ability to re-bill these unpaid procedures to the insurance company for additional payment consideration. The system will later give you the ability to print insurance claim forms only for those service already billed but not yet completely paid. Please refer to the section of the manual titled "Insurance Claim Processing" for more detail on this function.
Once you have entered the above information necessary for you, click on OK at the lower right hand portion of the screen. The system will prompt you to “Enter the amount to transfer to the patient”. If applicable enter the amount you wish to transfer to the patient here. Once you have entered the amount or left it at zero (whichever applies to you) click on the OK button in this window. From this point the system gives you the option to transfer to other transactions related parts of the program. You will be prompted with the following questions: Do you wish to Print a Claim Form for this service? Is there any adjustment for this service?, Do you want to print a Walk Out statement for this service? . If you would like to perform any of these transactions you can choose yes to these prompts and the system will take you to the appropriate section of the package, otherwise enter No. If your answers were No to these options the system will return to the main screen of the program.
Note: If you are using the "Blue Book Mtce." function of the system, once you have completed entering the split for the line item posting the system will ask you if you wish to edit the amounts of these procedures in the "Blue Book". If you decide to edit the amounts in the "Blue Book" then the system will bring up the appropriate codes so that they can be edited. If you are paying a procedure not listed in the "Blue Book" then the system will also give you the ability to add this procedure to the "Blue Book" file.
You have now completed the payment entry function of the system. Proper entry of your payment is very important for the purpose of properly maintaining your patient accounts. It is recommended that if you are not sure of the proper way of entering a payment, to follow the instructions in the manual along with your entry the first few times.
IV. Enter An Adjustment
There are three ways to affect the balance of a patients account. By entering a service you increase the balance of a patient account. By entering a payment you decrease the balance of a patient account. However, there exist circumstances for which you need to alter the balance of a patient account; not necessarily a service or payment received. The entry, which handles these special circumstances, is known as an adjustment. To cite some circumstances requiring adjustments, they are: bad debt, write off, insurance disallowances, courtesy discounts, professional courtesy, write off-patient deceased, etc... These are just a few instances requiring the posting of an adjustment to a patient account. To specify to the system the different types of adjustments that your office will utilize, you must update this information in the Edit System Codes section of the package; specifically under Adjustment Codes.
To implement this function, using your mouse click on the “Enter Adjustment” button located in the Transaction Related Functions column of the package. The system will then proceed to ask you for the patient ID# and Sequence #. If you do not know these numbers follow the procedure to search for Patient Id # and Sequence # previously explained in this manual. . Once you have selected the patient for whom you wish to enter an adjustment, the system will then bring up the adjustment entry screen. The adjustment screen has two tabs or areas, the Adjustment information tab and the Adjustment by procedure tab. Lets go over the fields of entry in this section of the system.
A. Adjustment Information
Date
Enter here the posting date for the adjustment. This is a self formatting date field meaning that if you wish to enter a service for November, 20 1990 your entry should be: ENTRY: 11201990 not 11/20/1990
Amount
Enter here the amount of the adjustment that you are going to enter at this time. If the amount is $55.00 then your entry should be the following; ENTRY: 55. If the amount is $55.25 then your entry should be:
ENTRY: 55.25
Source
Enter here the source of adjustment being posted. To get a list of your adjustment source codes click on the drop down arrow in this field. From the listing you can select the proper code for the adjustment being processed.
EX: You are entering an insurance disallowance and your internal system code for Insurance disallowance is "INSDIS" then your entry here should be:
ENTRY: INSDIS
Reference
Enter here any reference that you would like to store for the adjustment being entered. Such as an exclusive reason to substantiate the appointment to someone reviewing the books at a later date. For example, a patient past away and you are doing a write off, and then you can use this field to maintain the date of expiration, place, etc... This is an open field in which you may enter any information that you wish up to a maximum of 15 alphanumeric characters.
Post amount to Insurance or Patient
If you are using a two-balance system, then you must enter whether this adjustment is going to be applied to the patients balance "P", or the payment will be applied to the insurance "I". It is imperative that the proper entry be made in this field, due to the fact that the system will update the patient’s balance according to this entry.
Note: The following information is only for those practices that are using the line item posting function of the system.
Comments
This is an alphanumeric field and may be up to 27 characters long. This field is used to place a comment about the patient in its demographical record. This comment will come up anytime the patient’s record is retrieved, even when entering transactions to the particular patient. E.I. Bad Pay, Don’t accept checks.
B. Adjustment by Procedure
On the “Enter An Adjustment Screen” there is another tab that is available to you. This area is “Adjustment by Procedure”. If you are using the line-posting option of the package in your practice, here you can split adjustments and change the completion flags. When you bring up this area of the package the screen will display the procedures that have been entered for this service, the CPT number and the balance. You then have two fields that you enter the amount adjusted and the completion flag for each procedure. This is further explained below.
Amount
On this screen you have a field to enter the amount being adjusted for each procedure. There are two options that you have when entering the line item amounts. For one you can leave all the items at 0.00, then the system will post the entire amount to the service. The second option being, entering the correct detail amounts to each service. Enter your choice here. If your amount does not contain any amounts to the right of the decimal point then you can just write the numbers to the left of the decimal place and hit ENTER. For example, if the amount is $85.00 then your entry would be; 85. If the amount is $55.25 then your entry would be; 55.25.
Completion Flag
This flag is used to tell the system if there are some services within a claim that have not yet been paid or they need to be re-billed. If the answer is "Y" the system will assume that no other payment or response for that service is necessary from primary. If the answer is "N" then the system will maintain the service on open status and you will have the ability to re-bill these unpaid procedures to the insurance company for additional payment consideration. The system will later give you the ability to print insurance claim forms only for those service already billed but not yet completely paid. Please refer to the section of the manual titled "Insurance Claim Processing" for more detail on this function.
Once you have entered the above information necessary for you, click on OK at the lower right hand portion of the screen. The system will prompt you to “Enter the amount to transfer to the patient”. If applicable enter the amount you wish to transfer to the patient here. Once you have entered the amount or left it at zero (whichever applies to you) click on the OK button in this window.
You have now completed the adjustment entry function of the system. Proper entry of your adjustments is very important for the purpose of properly maintaining your patient accounts. It is recommended that if you are not sure of the proper way of entering an adjustment, to follow the instructions in the manual along with your entry the first few times.
V. Print A Walk Out Statement
A walkout statement is a receipt that you can give to your patient's as they are checked out in your practice. This Walkout statement provides a disclosure of the current date services performed to the patient; thus, acting as their receipt for the day.
Click on the button that reads ”Walkout Stm”. The system will prompt you to enter the patient ID#. Enter the ID# you need, if you do not know the patient ID# Search for it by the method previously explained in this manual. Once you have entered the patient ID# click on OK. Immediately after your printer properties window should pop up. Enter the information desired and send to print.
If a patient that came in a few days ago wants a receipt of his transactions you may obtain one by: Changing the Effective date before you select the Print Walkout Statement button. On the main screen of the program the date is displayed on the lower left hand side of the program. Click on the actual date and a window will pop up and you have the ability to change the date. Enter the date desired and click on OK. To retrieve the original date you must go through the same process.
Note: Make sure that the printer is ready and has paper loaded properly before implementing this function; although the system will warn you if the printer is not ready.
VI. Enter A Deposit
To implement this function using your mouse click on the button “Enter Deposit” in the transaction related functions column on the program. The system will prompt you to enter the patient ID#. Enter the ID# you need, if you do not know the patient ID# Search for it by the method previously explained in this manual. Once you have entered the patient ID# click on OK. The system will then bring up the Deposit Screen. Lets go over the fields of entry in this section of the system.
0
Figure C.8
Date of Deposit
Enter here the date that you would like the system to post the transaction on. For example if this deposit entry is to appear on September 21, 1952 then your entry here should be 092152. This is a self-formatting field, the system will place the dashes to separate the month /date/year automatically.
Amount of Deposit
Enter here the total amount of the deposit that you are posting at this time. Enter that amount here. If your amount does not contain any amounts to the right of the decimal point then you can just write the numbers to the left of the decimal place and hit ENTER. For example, if the amount is $85.00 then your entry would be; 85. If the amount is $55.25 then your entry would be; 55.25.
Source of Deposit
Enter here the source of deposit code for the deposit being posted. This field should contain the internal system code for the patient’s insurance company, if applicable. The code for the patient’s insurance company is listed at the top right portion of the screen. If at this time it does not appear you can click on the drop down arrow in this field and choose the appropriate code from the listing of codes in your system. It is very important that you use the proper source of deposit because the system will base all income production reports on these entries. For example, if the deposit came in from Medicare and the code for Medicare in your system is "MD" then your entry here should be: ENTRY: MD
Bank Account Code
If you are using Bank Codes in your system then enter here the appropriate bank code for the deposit that you are entering at this time. The system is prompting you for the internal system code that corresponds to the bank where the monies of the deposit being entered will be deposited. For a list of all your internal system bank codes click on the drop down arrow in this field and choose the bank code needed for this deposit.
Deposit Reference
This is an open, free editing field, which is used to store any information you might want to store relative to the deposit. However, it is recommended that you use this field to maintain the check number for the deposit received, due to the fact that the system will give you a report by reference number at the end of your daily transaction report. This feature can be helpful in the case that an insurance company sends you a check paying on multiple patients. If you enter the check number at the "Reference" field every time you enter a deposit, then the system can give you a report of reference numbers showing you the total amount of deposits posted for every specific check number. This amount should balance with the amount of the check received. If it does, it means that you entered the deposit distribution per check, correctly. Otherwise, this report will assist you in identifying which check was distributed incorrectly, consequently resulting in an erroneous entry made.
Post amount to Insurance or Patient
If you are using a two-balance system, then you must enter whether this deposit is going to be applied to the patients balance "P", or the deposit will be applied to the insurance "I". It is imperative that the proper entry be made in this field, due to the fact that the system will update the patient’s balance according to this entry.
Note: The following information is only for those practices that are using the line item posting function of the system.
Comments
This is an alphanumeric field and may be up to 27 characters long. This field is used to place a comment about the patient in its demographical record. This comment will come up anytime the patient’s record is retrieved, even when entering transactions to the particular patient. E.I. Bad Pay, Don’t accept checks.
Deductible
This field will automatically default to the deductible you entered in the patient’s demographical screen. In that area you entered a deductible for Primary Insurance Company, this will consequentially show up here. If you need to edit this field you can do so, otherwise just press enter to move on to the next step.
Once you have entered the above information necessary for you, click on OK at the lower right hand portion of the screen. The system will then take you to the main screen of the program.
Note: If you are using the line item posting option of the system, when a deposit is applied the system will leave the line item amounts at 0.00 and post the entire part of the Deposit to the service entry as a whole. If you wish to have this deposit entered in line item format then you should delete the deposit, and then make a regular payment entry.
VII. Enter A balance Forward
When you first get your system and you are entering patients that have been to your practice before, you must first create their demographical records. After you have created the appropriate records you must determine if the patient has a balance. If the patient has a balance, you must advise the system of it. The way we do this is through entering a balance forward. You may only enter a balance forward once for each patient. If you try to do this the system will warn you and will not allow you to enter another balance forward. To enter a balance forward amount to a patient's account using your mouse click on the button” Enter Bal.Fwrd”. the system will the bring up a window prompting you with the following questions:
0
Figure C.9
Enter Patient Id
Enter here the patient Id that you want to record the balance forward for. If you do not know the patient Id#, use the search method previously explained in this manual.
Date:
Enter here the date as of when you wish the balance forward amount to reflect on the patient's ledger, purpose of aging said amount. . This is a self formatting date field meaning that if you wish to enter a service for November, 20 1990 your entry should be: ENTRY: 11201990 not 11/20/1990
Amount:
Enter here the amount of the balance forward. Enter here the amount of the adjustment that you are going to enter at this time. If the amount is $55.00 then your entry should be the following; ENTRY: 55. If the amount is $55.25 then your entry should be:
ENTRY: 55.25
Once you have entered the balance forward information, click on OK. The system will then pop up a “Patient Responsibility Estimate” window. In the Percentage field: Enter here the patient responsibility percentage, this amount is based on what the patient needs to pay, If you do not know the patient responsibility percentage you may leave this field blank. If you enter a percentage the system will calculate the dollar amount for you. After you have done this click on the okay button to bring to a close this transaction. (Entering a Balance Forward) If you have saved the balance forward the system will display it on the patient ledger as a balance forward.
VIII. EOMB Payment Entry (insurance payment entry)
The insurance payment function will allow you to process your insurance payments in a more efficient and rapid manner. This function will automatically calculate your insurance disallowances based on the user entering what amount the insurance approved and how much the insurance paid, and will also calculate what the patient responsibility is. If this payment entry is used for Medicare it will also calculate what the Gramm-Rudman disallowance is. Before you start to use this function you must set what your default Medicare code is, and what your disallowance codes are in the System Management section of the package. Also you should establish what your default disallowance codes will be for your other insurance carriers, other than Medicare, in the section of the system entitled "Edit System Codes".
From the main menu of the system using your mouse click on “Tailor TO User” button. At this time the system will ask you to enter the password of your system. If you do not know your system password please contact the software support department at Budget Computer Systems Inc. When you enter the tailor screen at the bottom right portion of the screen you will see that there
are three default questions, they are the following;
0
Figure C.10
MEDICARE DISALLOWANCE CODE
REDUCTION ADJUSTMENT CODE
MEDICARE CODE
Note: Prior to using this option it is necessary that you go to your internal system insurance company codes and make sure that the percentage paid field is up to date. By entering the percentage that the insurance company pays you the system can properly calculate the payment amount based on the amount approved, when using the insurance payment function of the system. To edit the insurance company codes go to the "Edit system codes" section of the system form the main menu. Then select the insurance company codes. Follow editing procedures herein. For more information on editing codes, refer to your system manual.
Medicare Disallowance
Enter here your internal system Medicare disallowance adjustment code. If you do not remember your adjustment code for a Medicare disallowance then you can click on the drop down arrow and the system will display a window with all the available systems adjustment codes. From here choose the appropriate Medicare disallowance code. If your Medicare disallowance code is "MEDDIS" then your entry here should be; MEDDIS
Reduction Adjustment Code
Enter here your internal system Gramm-Rudman reduction adjustment code. If you do not remember the code then you can click on the drop down arrow and the system will display a window with all the available systems adjustment codes. Select the proper one from here. If your code is "GRHDED" then your entry here should be; GRHDED
Medicare Code
Enter here your internal system Medicare insurance company code. If you do not remember your internal system insurance company code for Medicare then you can click on the drop down arrow and the system will display a window with all your internal systems insurance company codes. From here choose the appropriate code for Medicare. If your internal system code for Medicare is "MCARE" then your entry here should be; MCARE
Once you have entered these three default codes then you click on Save to save the information you have just entered. This information is necessary so that when processing Medicare payments the system can automatically place the proper payment and adjustment codes into each transaction. Lets now go over how to enter the insurance payment.
In the main screen of the program click on the button “EOMB Payment” in the Transaction related functions column of the program. The system will now ask you for the following information.
Transaction Date
Enter here the transaction date that you wish to post your payment's under. That is, the date the payment was received. The system will default to the current effective date, you can change the date as necessary. Remember this is a self- formatting field and you need not enter dashes to separate the day month and year.
Reference
Enter here any reference that you wish to store with the transactions. For example the check number associated to the transaction, or any other reference that you use.
Insurance Company
Enter here the internal system insurance company code for the payment that you are entering at this time. The system will automatically default to the Medicare insurance company code.
Note: Once you answer these three questions the system will then begin to enter payments in batch mode. Every payment that you enter will have the same transaction date, the same transaction reference, and the same insurance company code. This function will serve the purpose of entering a payment received for multiple patients and/or multiple claims. If you have entered various payments and then need to enter a payment from a different insurance company or a different transaction date or even a different transaction reference you will need to <ESC> escape from the Insurance payment function and then start again.
The system will then proceed to ask you for the patient ID# and Sequence #. If you do not know these numbers follow the procedure to search for Patient Id # and Sequence # previously explained in this manual. Once you have completed this information the system will then prompt you for the following information.
Amount Approved
Enter here the amount that the insurance company approved from the services that you submitted for payment. For example if you sent a claim totaling $100.00 and the insurance company approved $72.25 for payment then your entry here should be; 72.25
Deductible
If any amount of the amount approved was applied to the patient’s deductible enter that amount in this field. For example, if out of the $77.25 that was approved $50.00 was applied to the deductible, then your entry here should be; 50.00 If no amount was applied to the deductible then you should leave this field blank.
Amount Paid
Enter here the amount that the insurance company paid. For example, if the insurance company approved $77.25 and paid 80% then the amount paid was $61.80; Therefore, your entry here should be: 61.80 Once this information is entered click on the GO button, the system will then run a calculation of how much the insurance company paid, how much was disallowed and what is the patients responsibility. The transfer to patient balance will only occur if the system identifies that the patient has no secondary insurance. If you are entering Medicare payments then the system will also calculate if there is any Gramm-Rudman reduction amount. The screen will display the following;
_ GRH PERCENT
_ PAYMENT SOURCE: Insurance Comp. Code
_ BANK ACCOUNT: Blank unless entered
_ DISALLOWANCE ADJMT: Adjust. Default from INS.
_ DISALLOWED AMOUNT: Amount disallowed
_ GRH DEDUCTION CODE: Gramm-Rudman adj. code
_ GRH AMOUNT: Gramm-Rudman $
If your system uses the two patient balances then the following will also appear:
_ PATIENT RESPONSIBILITY: (Pat'n resp. amount)
If you wish to change any of the information above the system will allow you to edit any of the above fields. To save the information from above click on Accept, if you want to cancel the whole transaction, click on cancel to do so.
Note: The following information is only for those practices that are using the line item posting function of the system.
Once you have Accepted the above information the system will bring up a Amount Disbursement Screen. When you bring up this area of the package the screen will display the procedures that have been entered for this service, the CPT number and the balance. You then have two fields that you enter the amount adjusted and the completion flag for each procedure. This is further explained below.
Amount
On this screen you have a field to enter the amount being paid for each procedure. There are two option that you have when entering the line item amounts. For one you can leave all the items at 0.00, then the system will post the entire amount to the service. The second option being, entering the correct detail amounts to each service. Enter your choice here. If your amount does not contain any amounts to the right of the decimal point then you can just write the numbers to the left of the decimal place and hit ENTER. For example, if the amount is $85.00 then your entry would be; 85. If the amount is $55.25 then your entry would be; 55.25.
Completion Flag
This flag is used to tell the system if there are some services within a claim that have not yet been paid or they need to be re-billed. If the answer is "Y" the system will assume that no other payment or response for that service is necessary from primary. If the answer is "N" then the system will maintain the service on open status and you will have the ability to re-bill these unpaid procedures to the insurance company for additional payment consideration. The system will later give you the ability to print insurance claim forms only for those service already billed but not yet completely paid. Please refer to the section of the manual titled "Insurance Claim Processing" for more detail on this function.
Once you have completed editing the completion flag, or if you decided not to edit, then click on the okay button. The system will also check that your line item distribution is either 0.00 or that the sum matches the amount of the entry. If the sum does not match the amount of entry then the system will give you a message saying that the distribution of the adjustment does not match the amount of the entry. If applicable in your practice the system will proceed to ask you if you want to update the blue book. Answer Yes or No accordingly. Every time that you store a payment entry the system will ask you once again to "Enter the patient ID number" and the "Sequence number to apply this payment to. It will by default automatically leave the ID# and SEQ# of the previous entry. Edit if necessary. You can continue entering payments until you have completed the batch. Once you are finished and the system asks you for another patient number press the Cancel button and the system will total out your batch of payments and adjustments, and give you a summary on the screen. The summary will show as follows;
Posting Summary:
Total billed: (AMOUNT)
Total approved: (AMOUNT)
Total Deductible: (AMOUNT)
Total disallowed: (AMOUNT)
Total GRH deduction: (AMOUNT)
Total paid: (AMOUNT)
You can use these amounts to balance against the check that was just posted, to assure that you posted the check completely and accurately. The insurance payment function of the system will assist you in promptly and accurately post your insurance payment entries into the system. To end this transaction and close the posting summary window, click on OK.
Note: It is recommended that you do a print screen of the above referenced information, so that you can maintain it with your E.O.B. for future reference, reflecting proper entry of your payments and adjustments.
IV. Treatment Entry
The treatment entry function is used to enter multiple services to a patients account with only one code, rather than having to enter multiple codes. For example if all new patient are required by your practice to have a certain number of tests performed to them, then you can store all these procedures under a treatment code. Therefore you will be able to bill the patient for all the procedures by only using one code of entry, in comparison to three, four, or five etc...
From the main screen of the program, click on the button that reads” Treatment Entry”. The system will first ask you to enter the patient's ID#. Once you have entered the patients ID# the system will then take you to the treatment entry screen. There are four subsections on this screen, Service Information, Other Information, Work Related Information and Hospital/Facility Information. Lets go over each field in theses areas.
A. Service Information
Figure C.11
Service Date
Enter here the date on which the services were performed. The system will automatically default to the current effective date. You can change it, if necessary.
Physician
The system will automatically default to the patient’s physician or to the physician from the previous service entry. If the physician performing the procedures is different than the one that the system is defaulting to then you can change it as necessary.
Ref. Physician
The system will automatically default to the referring physician in the patient record, or to the referring physician from the previous service. If the referring physician for this patient in this instance is different to the one shown here then you can change it as necessary. For a listing of the referring physician codes in your system, click on the drop down arrow in this field and the system will display a window with all the available referring physician codes in your system.
Type of Service
Enter here the type of service for the transaction that you are posting at this time. If these services are going to be billable to insurance then enter an "I", if they are only billable to patient then enter a "C". These codes are based on your codes file in the section of Edit System Codes, specifically under "Service Type Codes". To see you’re available choices click on the drop down arrow in this field and choose the appropriate code.
Routing Slip No
If your office uses the routing slips offered by the system, then enter the appropriate routing slip number otherwise leave blank. Remember that the treatment entry function will serve the same purpose as the regular service entry. Follow the same procedure to enter both.
Diagnosis #1 - #4
The system allows you to enter up to four diagnosis for each treatment. Enter the appropriate internal system diagnosis codes as necessary. If you do not remember your internal system diagnosis codes you can click on the drop down arrow in this field and the system will bring up a display showing the available internal system diagnosis codes, just like on your regular service entry screen..
Treatment Code
Enter here now the appropriate treatment code for the treatment that you are entering at this time. If you do not remember your internal system Treatment Code you can click on the drop down arrow in this field and system will bring up a display showing the available internal system treatment codes. For example if you are entering a new patients transactions and the treatment code for a new patients services is "NEWPAT" then your entry should be : NEWPAT
No of Treatments
If you would like to have the system bill this patient for multiple treatments performed then enter here the appropriate number. For example if the above treatment was performed three times then you should enter here; 3
Note: Remember only to use the treatment code entry function when a patient is seen for the procedures that are specified under the treatment code to be used. If a patient has not had any of the procedures under a treatment code performed then you cannot use that treatment code. You may have to use the regular service entry, or add a new treatment code to your system.
Authorization No
Self-Explanatory. Enter here the appropriate Authorization number if applicable.
B. Other Information
The information on the second page many times will not be used, but on certain circumstances special situation will need to be specified in this area.
Date of first Symptom
Enter here the date that the patient was diagnosed with the symptoms herein being billed. Some insurance companies may require this information to determine if some pre-existing condition may or may not be covered. Remember this is a self- formatting field, you do not need to enter dashes to separate the month, day and year, the system will place them automatically for you.
Price Level
This field works in conjunction with the fee schedules as set up in your procedure codes (Refer to the section of the manual entitled "FILE MAINTENANCE"). The system will default the price level as specified by the entry in your patient’s demographic file.
Accept Assignment
This field is used to specify to the patients insurance company on the claim form, if you are accepting assignment of payment for the patient being billed. The system will default this information from the patient’s demographic file, although you can change it according to the situation.
Functional Status Code
This field is prompting for the entry of the internal functional status code, when applicable, which corresponds to the claim hereby being processed.
C. Work Related Information
Work Related
Enter here if the treatment being performed is work related. Enter "Y" for yes, or "N" for no.
Date able to return to Work
If the services hereby being performed are work related, then enter here the date that the patient is able to return to work. Remember this is a self-formatting field, you do not need to enter the dashes to separate the month, day and year, the system will place them automatically for you.
D. Hospital/Facility Information
Hospital Admission Date
If the treatment that was entered was performed while the patient was hospitalized, then you must enter the admission date in this field. Remember this is a self-formatting field, you do not need to enter the dashes to separate the month, day and year, the system will place them automatically for you.
Discharge date
If the treatment hereby being entered was performed while the patient was hospitalized, then enter the date that the patient was discharged. . Remember this is a self-formatting field, you do not need to enter the dashes to separate the month, day and year, the system will place them automatically for you.
Hospital/Facility
Enter here the code of the hospital in which the treatments entered were being performed. If you do not remember you internal system codes for this click on the drop down arrow in this field and choose the appropriate code.
Once you have finished entering your information on the treatment entry screen click on the OK button located at the lower right hand side of the screen, to save this information, or if you do not want to continue or save this click on the cancel button located at the lower right hand side of the screen. The system will then pop up a “Patient Responsibility Estimate” window. In the Percentage field: Enter here the patient responsibility percentage, this amount is based on what the patient needs to pay, If you do not know the patient responsibility percentage you may leave this field blank. If you enter a percentage the system will calculate the dollar amount for you. Once you are finished Click on OK to conclude this transaction. The system will take you back to the main screen of the program.
X. Print a Routing Ticket
If a patient comes in to your practice, and you would like to print a routing ticket to give to the attending physician, to mark off what services were performed to the patient, just click on the button that reads “Routing Ticket” in the transaction related functions column of the program. The system will prompt you with
Enter the patient's ID number:
Enter here the ID# of the patient that you would like a Routing Ticket for. If you do not know the ID# you can use the search method previously explained in this manual. Once you have selected the patient that you would like a Routing ticket for system may also ask for the name of the routing slip form, in the case that your office uses multiple routing slips. Usually the system will default to the name of the routing tickets as specified in the "Tailor System to User" section of the system. Once the information is inputted in the system click on the OK button and the form will print out.
Note: Routing tickets can be also printed on a daily basis for all the patients who have appointments in the appointment control section of the package. For information on how to use the appointment control feature of the program refer to the "Appointment Control" section of this manual. Make sure that you printer is ready and has paper loaded into it properly, before implementing this function. Although the system will advise you if the printer is not ready.