APPOINTMENTS
INTRODUCTION
This section of the manual will explain the use and the functions of the appointment book function of the system. The appointment book function of the system was such an important and effective section of your system that we implemented a section of the manual strictly to explain and elaborate on its functions. You will find this tool of your solution very effective and time saving to your practice. To access this function, press the F3 key on your keyboard and the system will bring up the appointment screen of the package.
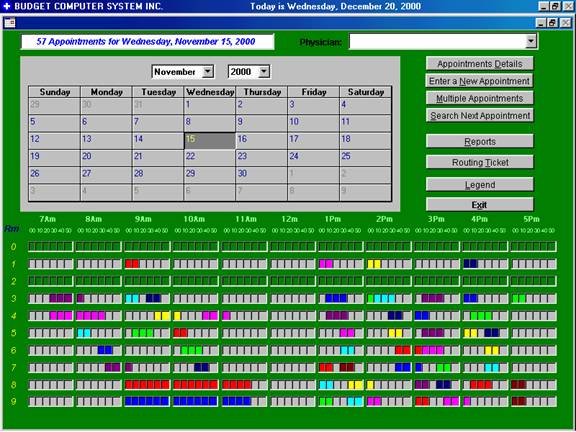
Once the appointment book screen appears you will notice at the top right portion of the screen, Please refer to figure K.1 for an example of the appointment screen, the different types of functions that you will have the ability to conduct. On the bottom half of the screen you will have a time ruler, so that when you enter appointments the time ruler will be highlighted with a color , chosen by user, to display the times that have already been given out for appointment. The system also has different rows displaying appointments scheduled for the same day, but in different rooms. This will allow you to clearly see the different scheduling all in one screen, for forecasting and scheduling of new incoming appointments. If you have multiple doctors in your office, on the top right portion of your screen click on the drop down arrow and choose the doctor you wish perform an appointment related transaction for. Lets go over the different functions of the appointment book;
Figure K.1
I.Appointment Details
I. Enter A New Appointment
II. Multiple Appointment
III. Search Next Appointment
IV. Reports
V. Routing Ticket
VI. Legend
VII. Exit
I. Appointment Detail
The system will display on the top portion of the screen a calendar . You can choose what month to display. To do this click on the two fields that have drop down arrows and choose the month and year you need. Once you have chosen the month and year , to see what appointments are scheduled for a specific day click on that ay , when you do this you will see that you have marked this day, the time ruler will show the appointments for that day and on top of the calendar the system will display the number of appointments and the date. If you wish to see the appointment detail you can click on the button that reads “appointment detail” or while having the day highlighted you can just hit enter. The display will include the room the appointment is scheduled in, Starting time of the appointment, Ending time, type of appointment (A-J), name of the patient, procedure for which the patient is coming in for (if entered by the user) the home phone, work phone and comments.
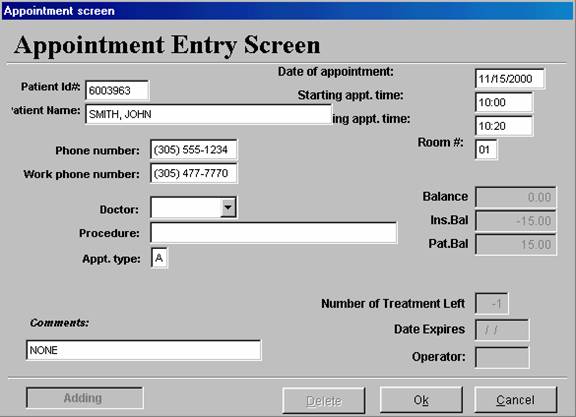
Figure K.2
II. Enter A New Appointment
To access this function you can do one of two procedures. You can rather click on the button that reads “Enter New Appointment” or on the time ruler, click on the actual time box that you want to make the appointment on. If you click on a box that is empty it will ask you if you want to enter a new appointment answer Yes or No accordingly. After choosing one of these options the system will prompt you for the following”:
Patient Id#
Type in the ID# of the patient that is coming in for an appointment. If you do not know the patients ID# you can do a Name Search at this time by hitting the "F-2" or right clicking on this field. After entering the ID# the system will bring up most of the information to fill out the questions on the rest of the page. In the case that a patient is coming in for the first time and does not have an ID# you may leave this field blank but then you must enter all the information manually.
Starting & Ending Time
Enter in these two fields the starting time to ending time of the appointment that you are entering. The system will not let you schedule appointments before or after the time chosen by the user in the “Tailor to User” section of the package.
Room #
The system gives you the ability to store appointments for different room numbers within the same date. The room number that you use to schedule the appointment is equivalent to the graph bar at the bottom of the screen. For example if you give appointments with room number one, and room number two, at the bar graph the system will display each dates appointments on the same graph but on different lines. This function can be used in the case that you have multiple Doctors working at the same time, in different examination rooms, and you wish to schedule them by room, rather than by doctor. You should use room numbers in numerical order, for example starting by "1". If you do not wish to use this function you can simply leave this field blank and the system will default to the first room automatically. You have the option to enter an in up to nine different rooms.
If you did not enter a patient Id # you will have to enter the following three fields manually:
Patient Name
Enter the last name first, and the first name last, separated by a comma.
Phone Number & Work Phone Number
Enter here the patients work phone number and home phone number. This entry is very important in the case that you will need to contact the patient to reschedule or confirm
Doctor
Self-Explanatory. Enter here the patient’s doctor.
Procedure
Here you can enter the procedure of the service that is going to be done to that patient when he/she comes in. This procedure will be displayed when you print a list of your daily appointments, for the purpose of allowing you to better prepare for the patients that you will see in your practice on that day. It is not a requirement to enter a procedure in this field, but if it is helpful to your practice then you can use this function.
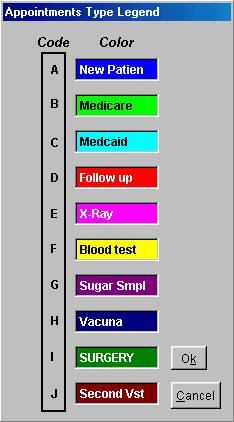 Figure K.3
Appt. Type
In this field you may enter the appointment type that you are scheduling by entering a letter between (A - J). Depending on the letter that you enter the system will display a different color for the appointment on the appointment graph. You may define what each letter of the appointment type represents for your appointment book. By right clicking on this field a window will pop up that will show you each letter followed by color and you can edit in each field what you want the color to stand for.
Comments
Enter here any comments that you may have, that may be important in the handling of this patient. This comment will show on your appointment book printouts.
After you have completed the information of the appointment click on okay to save the information, the time ruler at the bottom of the appointment book will be highlighted with a bar to display that the time was already taken up. You will have the ability to duplicate times of appointment. Please note that if you overlap an appointment the color that will display will be that of the higher letter of the appointment type.
III. Multiple Appointment
The entry of this option is exactly like the entry for New Appointment, but this allows you to make several appointments for one patient at once. To access this option click on the button that reads “Multiple Appointments”. The system will bring up a screen asking you the same questions as it does when you are entering a regular appointment. After you enter the information and click on okay the system will pop up another window asking you the following:
How many times will this appointment be scheduled?
Self-Explanatory. This field is asking you how many times you wish to schedule this appointment. If you need to schedule three appointments your entry here should be 3.
Frequency
This field is prompting you to enter the frequency or how often you wish to schedule this. In other words if you wish to schedule this appoint every 30 days (once a month) you entry here should be 30. This entry works in conjunction with the previous one, if above you entered 3 then this appoint will be scheduled every 30 (once a month) three times, (for the next three months)
After entering the information click on okay and the system will schedule these appointments according to your entry.
Note: If while posting the multiple appointments the system finds that a particular time slot has already been given, it will give you a warning and ask you to confirm if you want to schedule it on that date and time any how.
v Deleting an Appointment
You can delete an appointment by one of two ways. One of the ways is by click on the button that reads “Appointment Details”, after clicking on here the system will bring up the list of appointments for the day requested ( as previously explained). Once here there is a small box before the starting time, using your mouse click on here (on the one of the appointment you wish to delete), the system will black out this box meaning you have deleted the appointment, the next time you request this the appointment will no longer be listed not here or anywhere else on the appointment screen. The other option the user has to delete an appointment is by click on (on the time ruler) the actual appointment, the system will bring up this appointment information window, on this window there is a button on the bottom portion that reads “Delete” click on here and the system will delete this appointment from everywhere on the appointment book.
IV. Search for next appointment opening
This feature of the package allows you to search by time, day of the week and duration(how many minutes) for the next available appointment. To access this function click on the button that reads “Search Next Appointment” . The system will bring up a window that will prompt you for information needed to find the next appointment. It will as you for the following:
Starting & Ending Time
In these to fields enter the starting and ending time for the appointment you wish to schedule, if there is not a certain time needed leave this area blank.
Which day of the week
In this field enter the day of the week you wish to schedule the appointment for, if the day does not matter leave this field blank. To choose the day of the week you can either enter it or click on the drop down arrow and choose the needed day.
How many Minutes
Enter here how much time you need for this appointment, this field is set to minutes so I you need one hour for this appointment enter 60 (minutes) rather than 1
After you have chosen the criteria to find the next appointment the system will search for the next available day matching the criteria you selected. It will pop up a window telling you the date and time available, if that day is not good click on No and the system will give you the next day available. Once you have found the a good day, click on yes and the system will take you to that date and then go about entering this appointment like previously described above. If you want to exit this area just click on Cancel.
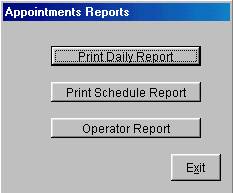
V. Reports Figure K.4
 In the
appointment book you have three reports you can print .These reports are explained
below. To access this function click on the button that reads “Reports”
In the
appointment book you have three reports you can print .These reports are explained
below. To access this function click on the button that reads “Reports”
and a window will pop up with the following reports to choose from:
- Print Daily Report
B. Print Schedule Report
- Operator Report
A. Print Daily Report
When you click on this button, the system will prompt you to enter the room number that you wish to print. For example if you have multiple doctors under the same appointment book, but under different room numbers, and you only wish to print the appointments for one doctor, then you can enter the room number here. Otherwise to print all appointments for the day leave this field blank. Please be sure that your cursor box must be positioned on the day that you wish to print the report for. After entering the needed information click on the okay button and the system will show you the report on the screen and you have the option to print from there.
B. Print Schedule Report
To access this click on the button that reads “Print Schedule Report”. The system will then prompt you for the following information:
Starting & Ending Date:
Enter here the date you wish to run the report for, I f you want it to run for one day, enter the same starting and ending date otherwise enter the range of dates you wish to run the report for.
Dr. to Include
Enter here the Doctor for which you want to run this report for, if you are not sure you can click on the drop down arrow in this field and choose the doctor you wish to run the report for. If you want to run the report for all doctors leave this field blank.
Appt. Type to Include
Self-Explanatory. Enter here the type of appointment you want to be included in this report. If you wish to have all appointments on this report leave this field blank.
After entering the needed information click on the okay button and the system will show you the report on the screen and you have the option to print from there.
C. Operator Report
To access this click on the button that reads “Operator Report”. The system will then prompt you for the following information:
Starting & Ending Operation Date:
Enter here the date you wish to run the report for, if you want it to run for one day, enter the same starting and ending date otherwise enter the range of dates you wish to run the report for.
Operator to Include
Enter here the Operator you wish include in this report, if you wish to include all the operators leave this field blank, if you do not remember the operator to include you can click on the drop down arrow in this field and choose the operator to include.
VI. Routing Ticket
This function of the program will allow you to print routing tickets for all the appointments for a specific day. Choose the day you want to print routing tickets for and click on this button, the system will then print a routing ticket for every patient that has an appointment that day. This is very useful and timesaving for your practice.
VII. Legend
This button of the package allows you to customize what each color symbolizes. In other words on the legend (the color that will show on the time bar depending on what type of appointment you choose) you chose which color stands for what. For example if you want all follow-up appointments to be red, you can customize red to stand-for Follow-ups. You have from the letter A thru J to label appointment types. Once you have entered the information click on okay to save your changes.
VIII. Exit
Use this button of the appointment screen to Exit out of the appointment book and return to the main menu of the program